A Blog Page for reviews of Cycle Products and accessories.
Do you Have a Cycling related product you would like reviewed?
Then feel free to contact us on Twitter @TDF79. Facebook Harlow Cycle Page. Instagram Harlow Cycle.
2019 The Year of the Bike! This a No Fee Paid Blog
A while back +Knog reinvented the good old fashioned bike bell!
And we are lucky enough to have one on review for you from +Knog in Australia.
Whats in the box: Packaging comes in a really neat sleeve with a clear front displaying the Oi bike bell, simply cut through the two ends of the sleeve where it has been stuck down and push the inner sleeve out to access the Oi bike bell.
Inside remove the Oi and remove the grey insert to reveal underneath fitting instructions, a small Hex key supplied along with a warning "Do Not Over-tighten Screw" piece of paper.
Large Spacer.
3 M Rubber tape for bars are 23.8, place this inside the larger spacer when fitting to smaller bars.
Available in other colors, Black, Brass, Copper, Silver.
Oi. (Brass)
Fitting: Fitting Instructions supplied, plus +Knog have a really great " How To Fit" video on @youtube, so take a quick look, it will help you all a lot, for those who do not have access to Youtube, the Oi is very easy to fit, simply remove the Hex screw and set aside, open the Oil and place on the bars in the required position, you will notice slots for your cables, so if your placing in a position around cables simply move them to the required position on the recessed slot, refit the Hex screw and tighten up, but "Not to Tight", and "Hey Presto" your all set to "Tink Away" !
For smaller bars you just simply need to fit the spacer ring first, then fit the Oi bell.
23.8 to 31.8mm Bar Size.
Brass Bell.
Hexagon Srew.
Close up of the Mini Springs holding the Oi outer ring.
Spring used in the Oi trigger.
Oi trigger.
My very First listen to the Oi bike bell from @Knog, first impression counts!
Conclusion: I just loved the sound, the feel of the Oi, the look of the Oi, it sits on the bars discretley, easy to fit, Fitting is straight forward, you will find a Spacer ring to help with fitting to a smaller bar 23.8 to 26mm located in the rear of the grey inner. Oi has a recesses within the bracket that allow for cables to sit underneath it. It’s a slim design that wraps around the handlebar and doesn’t protrude or take up much space. It’s so small that you will hardly notice it on your handlebars. For handlebars measuring 23.8 - 26mm in diameter +Knog have supplied a spacer to help the Oi fit snugly and securely to your bars. This can be found discretely tucked into the reverse of the grey packaging insert. Contact Details: Twitter Feed: https://twitter.com/Knog Facebook Feed:https://www.facebook.com/knog.peeps/ Instagram Feed:https://www.instagram.com/knog/?hl=en Or your Local Bike shop. Uk Disturber: http://www.moorelarge.co.uk/about/ Twitter Feed:https://twitter.com/moorelarge?lang=en Knog Oi Bike Bell on YouTube
A Very Big Thanks to the Guys at @Knog for getting the Oi bike bell out to me from Australia, so let me wish you all a "Merry Merry Christmas" to you all..
Add this to your Christmas Stocking Filler list, there is still time!
Thank you.
Please Feel Free to Support Our Sponsors Adverts.
Thank You.
Foot Note This is not a Paid Advertisement for +Knog
Harlow cycle page on Facebook:
https://www.facebook.com/Harlow-Cycle-Page-805601672891539/
YouTube: https://www.youtube.com/channel/UCBlXmH7f4X0Az_xr7Az0Yqg
Instgram: https://www.instagram.com/harlowcycle/
Tumbler : http://harlowcycle.tumblr.com/
Twitter Feed: @TDF79
Linkedin: https://www.linkedin.com/in/harlow-cycling-b785a1105/
Pinterest: https://www.pinterest.co.uk/Harlowcycle/pins/
Email: HarlowCyclingPageGroup@Hotmail.com
....................................................................................................................
How many people shy away from bleeding there Hydraulic brakes and rush off to there LBS and are charged for bleeding the system, could be as much as £25 for a caliper at some major cycle stores, so for the cost of the Epic Bleed Solutions Kit at £14.99 it could save you a fortune on brake bleeding, as some of you may know I have had on review a set of Hydraulic brakes from a company called Juin-Tech, the DB1 Brakes are available from there UK Distributor Edge Sports UK, see the links for details. (but do come back to my review blog)
Date of the review June 2015. https://www.edgesportsuk.com/store/juin-tech/juin-tech-db1-hydraulic-disc-brake-set-red-f-r-160mm.html
Over the course of the past two years have I have had no problems with the system or the brakes in any way, I can 100% recommend these as a up grade to any bike like I have said in my review blog, maintenance wise I should have maybe changed the Hydraulic fluid more often, but I have not, so, here I am with a "Soft" brake lever.... so where do I go from here... Read on to find out....
First thing I did once I noticed the lever was spongey was to remove the rear pad, easy enough to do, gave it a check and all was ok, so after checking the pipe line for any leakage or even a hole for any leakage it meant only one thing... "Brake Bleed" time.
Just to point out I am in no way a qualified bike mechanic, so if after reading this product review you feel your not confident to try it out, do pop along to your LBS for a brake service..
Having no real idea on how to bleed the brakes I turned to Youtube to watch a few video;s, looks easy enough, but still needed a lot more help on the way to do it, so the first point of call was to give Edge Sports UK a tweet on what do I need for the job, ( https://twitter.com/edgesportsukllp?lang=en ) who told me I need to bleed them with the Shimano bleed system, great news on that side, a easy kit to get hold of, nothing fancy, so off I go and find the Shimano bleed kit only to find the BD1 calipers do not have any bleed nipples for the tube to fit!
I took two photos , one of the brake lever bleed screw, and one of the Caliper to tweet to Edge Sports UK for advice.
BDBikes bench mounted stand, ideal for when the weather is horrid!
Brake lever bleed screw.
Rear caliper bleed screw.
It was pointed out the BD1 do not have a bleed nipple so the use of the Shimano Basic bleed kit would not be much good good as it fits on to bleed nipples, Edge Sports UK suggested I contact Epic Bleed Solution's, so a quick contact made vie twitter to +Epic Bleed Solutions and sure enough they have a Brake Bleed kit to do the job....
Kit recommended for the job is the Universal bleed kit selling at £19.99.
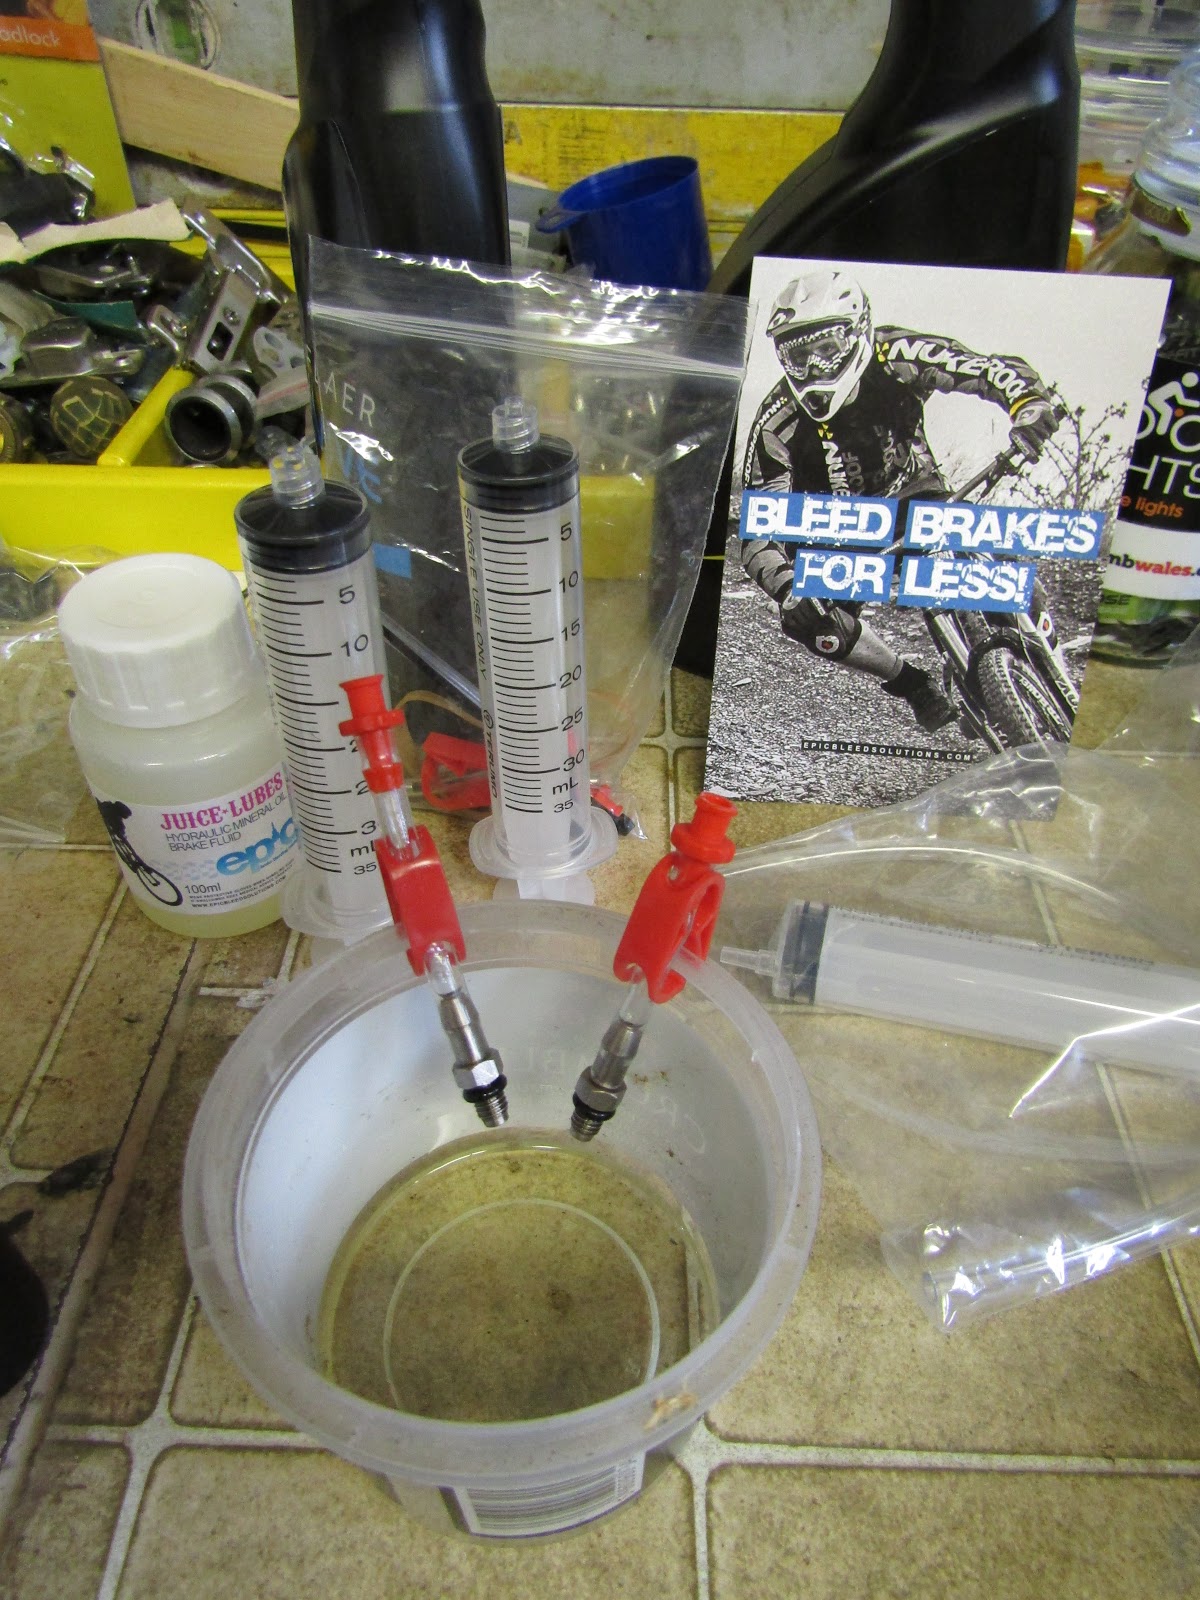
Once I got used to the contents of the kit I set it aside, placed the bike in the bench mount work stand and removed the rear wheel, removed the brake pads, sorted the bleed screws out and connected the right size bleed adapters to the syringe's filled up the syringe with fluid and proceeded to fit to the caliper and brake lever.
Syringe filled with the Epic brake fluid.
Brake pads removed.
10mm Hex Alan key used to keep calipers apart.
Blled screw removed and the bleed adapter in place.
Rear bleed adapter fitted and syringe filled with the brake fluid.
Old fluid coming out, was expecting a more black fluid, so surprised it was like new, but full of bubbles when first removing the fluid.
Out with the old, in with the new.
Container for the drain off of the brake fluid.
After pushing the fluid through and noticed no more bubbles time to remove the syringes and refit the bleed screws, refit the pads, reset the brake lever screw, wipe down the bike and give the brakes a try.
And they work!
More solid feel to the Juin-Tech DB1 Brakes.
CONCLUSISION: Absolutly a brilliat bit of kit that will save you money over and over, I was a bit nervous at doing the bleed of the brakes at the start, but watched several Youtube videos on brake bleeding, and went for a try, had no problems, the kit came with everything I needed to do the DB1 brakes, plus a load more in the kit as well,
Instructions in the kit are a bit on the scarce side, but like Epic say there are just so many combinations of brakes out there it is easier to check out a "How To" you tube video like I have done, it got me through the "Doubt I could do the bleed stage" .
One thing that I did come across in every "How to" video was make sure you get the right brake fluid, or you will be in big trouble later when the seals all go rotten and soft. and you don't want that do you.
Are you a Diy bike mechanic, if so you need to add this to your list of things to get, 10 out of 10 to Epic Bleed Solutions for putting a great kit together for the price.
22/11/2017 I received my first Christmas Present and Card from Nick at Ride Blackmore, which came as quite a surprise!
On opening the package was a Pair of Purple on Blue Statement Socks
The quality of the Blackmore Optic Coolmax socks is defined in the fact that I have constantly worn and laundered theses socks over that period of time and they still look and feel as new, which goes to prove quality pay's, and as a added bonus these socks are made in England.
The Wife will be pleased as I now have a spare pair, and she dose not have to have them laundered for the next day.
As a Christmas Gift to anyone reading this blog, Blackmore Apparel has given you all a 1/3 off a pair of Blackmore Socks using the code "xmassocks" when ordering.
Believe me you will not be disappointed with the quality of any of their products.
Merry Christmas to all the staff at Blackmore Apparel and all my readers.
Check out the website for their great Christmas stocking fillers
BLACK FRIDAY WEEK OFFER: Get 30% off at checkout, and first 10 pairs of the morning get 50% off!
Helmet Angel popped a set in the post to me to try out, very nice of them, so let me tell you all about the Snail like shells, simply put they fit to the side of your cycle helmet to the straps, and when you go for a ride the wind noise drops considerably, .... sounds simple, so let me tell you how I got on with the @HelmetAngel
Whats in the box: Nice carton containing two shell like ear pieces with a soft foam type inner cushion, a Helmet Angel sticker, and a contact card, also a very nice soft bag to keep them in.
Fitting: It took me around 10 minutes to fit the Helmet Angel to my cycle helmet straps, one each side in a certain position to cover my ears,
Helmet Angel fitted to strap.
First thing I did was fit one upside down to the strap, so removed it and took my time to study the shells a bit more, noticed the cushions could be removed as they are held on with a strip of velcro,
Cushion Pad on rear.
Helmet Angel has a nice slot to grip your cycle helmet strap, grips it nice and firm so I didn't find it slipping down the strap at all, good design on that part.
Found it much easier to remove the soft cushion attached by a velcro strip, this allowed me to stretch out the strap to feed into the jaws of the shell, then simply reattach the soft cushion.
Once the Helmet Angel was attached both side and moved into position to fit my ears it was out for a test ride on one of the most windiest days so far, and a perfect time for a quick test.
Conclusion: Found it a little bit fiddly to fit, but nothing too frustrating, a lot of off and on with the cycle helmet to get it right, I liked the soft cushion feel to the pads on my ears, I had a bit of flapping of the shells on one ear at first but soon found out my helmet straps were not tight enough, so a simple adjustment was needed, but the main thing you all want to know is do they work.......
Answer.... "Yes" absolutely they work a treat, on the short ride I went on it was the windiest day so far, and straight away I noticed the wind was kept away, not only that but found my ears were warmer as well! so a fantastic design for wind reduction, will I get used to the large shells fitted to the straps, to be honest if it makes the ride safer by letting me hear cars and not having to shout then yes, they will stay on the cycle helmet, so be sure to keep a eye on my Facebook and Twitter feed etc for updates..
Ideal for the winter rides, how well they work in the summer time only time will tell...
Helmet Angel priced at
£14.99
A big thank you to David Crampton the inventor of the Helmet Angel for giving me the chance to review the Helmet Angels, ordering is a simple process from there website.
I have on review a Mini hand pump, which comes all the way from Phoenix Arizona USA.
What is a mini hand pump you say?
Well it's a VERY small bike pump, which is in fact small enough to fit in your back pocket, cycle pouch and even your back pack.
Although it is small it will need to have the capability to pump your tyres up to a precise poundage,
depending on the bike you ride and the size of your tyres. the pressure could range from 25/35 PSI (Pounds per Square Inch) to 60/100 PSI.
I managed to get my hands on a Mini Pump that retails at around £19:99 from your LBS, (Local Bike Shop) and for this money I would expect it to pump my tyres up to around 100 PSI for my road bike, and 30 PSI for my mountain bike, in as few a pumps as possible...... After all I am not quite as young as I use to be !!!!!!!
What's in the box:
No box! Just a card with the details of the Serfas Switch Stick on front and rear, and of course the pump, along with a mounting bracket and a Velcro strap attachment.
Two 4mm fitting studs attached the pump to the card, [ DON'T throw theses away just in case you need them to fit the mount to your frame]. Great idea Serfas.
Dimensions: Technical Details
Weight: 124 grams
Hi pressure setting for easy pumping
Hi Volume setting for fast inflation.
Presta and Schrader tubes can be pumped up.
Pumping instructions are just the same as any other hand pump
The Serfas Switch Stick fits both valve types, so simply select the hole to fit the valve.
It really is as easy as they say.
I found the Switch Stick was comfortable fitted to the valve and comfortable enough to pump!
Size when closed 6 inches.
Size when open 8 1/4
FITTING: Found the Serfas mounting bracket no harder to fit than any other on the market, it held the Switch Stick firmly in place on a road bike frame.
Road Bike Fitting.
Mountain bike fitting.
Dust Cover
Dust cover to keep the dust and mud out the valve holes, fits nice and tight, with a small strap attached to the head of the pump so you do not lose it.
Large hole for the Schrader valve small hole for the Presta valve.
The dust cover fits well and will keep out dust and mud from the holes.
Strong lever.
Mounting bracket with Velcro strap.
Hi Pressure setting.
Hi Volume setting .
Road tyres.
Mountain bike tyres.
How many times do you go for a ride and have to keep checking the bike pump mounting to see if you have lost the pump some where on the trail ride, well the Serfas Switch Stick comes with a brilliant mount simple but so effective at how it holds the Switch Stick to the mount, take a look at the video here for a quick look at a test I did for you all...
CONCLUSION: Found the Serfas Switch Stick to be a really handy little Mini pump, handled everything I put it through, the road bike tyres were a little harder to pump up, but I managed to get them up to a decent poundage to continue a ride.
Mountain bike tyres were a lot easier to pump up.
Great size to carry in a cycle jersey pocket, ideal for those who want to cut down on weight, but handy enough to get you out of trouble.
Take a look at the SerfasUK website for more cycling products.
Please Feel Free to Support Our Sponsors Adverts.
Thank You.
Foot Note This is not a Paid Advertisement for SerfasUK
Harlow cycle page on Facebook:
https://www.facebook.com/Harlow-Cycle-Page-805601672891539/
YouTube: https://www.youtube.com/channel/UCBlXmH7f4X0Az_xr7Az0Yqg
Instgram: https://www.instagram.com/harlowcycle/
Tumbler : http://harlowcycle.tumblr.com/
Twitter Feed: @TDF79
....................................................................................................................